Simple Dinners 20 / Slow Cooked Lamb with Homemade Hummus

Slow Cooked Lamb with Homemade Hummus
Entertaining was one of those things that used to completely stress me out. I’d literally spend days changing my mind about the menu, go to the grocery shop without a list and forget a crucial ingredient. I put so much pressure on myself to get everything perfect that I would rarely enjoy my own events, and my kitchen has seen more than a few meltdowns.

These days, one of my absolute favourite things to do is invite family and friends over for a long leisurely lunch at my apartment. I much prefer relaxed and rustic style communal feasts instead of fussy three-course meals and I have a repertoire of crowd pleasing dishes that I know work every time. A great dinner party does not need to be complicated – the best part is the company, after all!

Today I wanted to share a few of my best entertaining tips that I wish I had known back when I was an enthusiastic but inexperienced hostess that I hope will save your sanity! And I’m also sharing a delicious recipe for Homemade Hummus that has changed my life!

Slow Cooked Lamb with Homemade Hummus

1. Don’t try out brand new dishes you’ve never made before.

This seems like a no brainer but I used to do this all the time in the early days of blogging. I was still learning so much about cooking and was excited to try a new recipe every week. Sometimes this didn’t end too well. My friends and family were always great sports about being my culinary guinea pigs but it certainly caused me a lot of unnecessary stress when things took much longer than I anticipated or flat out failed. I often find myself going back through my recipe archive here on my blog for ideas because I have tested everything and I know they worked and were delicious! I absolutely encourage you to try new things, but it’s much more enjoyable to experiment with a new recipe when there is no added pressure!

2. Sharing is Caring.

I love entertaining with big shared dishes placed in the middle of the table. You don’t need to worry about fussy plating of individual dishes, which is a pain! I love cooking this way because it feels generous and everyone can serve themselves, and go back for seconds. It turns dinner into a wonderful relaxed, communal experience. I’ve invested in some beautiful serving platters and wooden boards that get utilised in our home a lot.

3. Use your slow cooker.

In keeping with the point above, I love to serve some kind of slow cooked meat at my parties and gatherings for a few very important reasons…

  • Once you have put on the slow cooker, you can pretty much forget about it for hours.
  • The cuts of meat that are best for slow cooking including lamb leg or pork shoulder are also super inexpensive – great when feeding a large group of people – which means you can afford to splurge on a nice bottle of wine!
  • As a great bonus, you free up your oven space for other things like roasted vegetable side dishes or a dessert. Win win!

Slow Cooked Lamb with Homemade Hummus

4. Have a flavour theme.

I usually know if I want to utilise Asian, Italian, Middle Eastern flavours etc when I slow cook my meat and this helps to guide the rest of your menu planning, table styling and even as far as your choice of playlist! With lamb I like to use warm spices like cumin, coriander and cinnamon and this goes great with homemade flatbreads and dips for entree, side dishes like spice roasted carrots and a pomegranate dessert.

5. Write lists.

I am a mad list maker in almost all aspects of my life to help me keep track of everything and dinner party planning is no exception. When your menu is finalised, do a quick inventory of your fridge and pantry and make a shopping list so you don’t forget anything. The day before an event, I write another list to keep track of all the tasks I need to do roughly in order. This helps so I don’t forget to put out the cheese plate.

6. Prep in advance.

I hate feeling stressed on the day of my party when my guests are arriving and I haven’t even prepped the dessert yet. These days I try and make it easier on myself by choosing at least one course that I can make the day before. Desserts are often the easiest thing to make ahead of time – think ice cream cakes, panna cotta or cheesecake for some delicious options.

Slow Cooked Lamb with Homemade Hummus
I hope those tips help you next time you are planning a dinner party! Just a quick note on today’s recipe. I knew that it was simple to make homemade hummus but I had only done it once or twice before now. Just a handful of ingredients that you probably already have in your pantry come together in the food processor to make the most delicious dip, and now I’m not sure I can ever go back to store bought hummus.

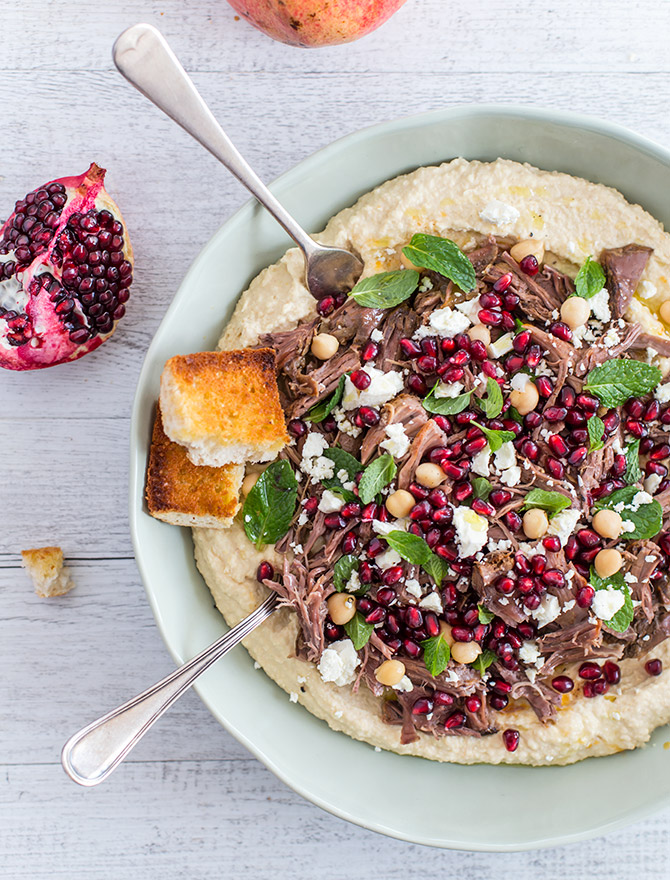
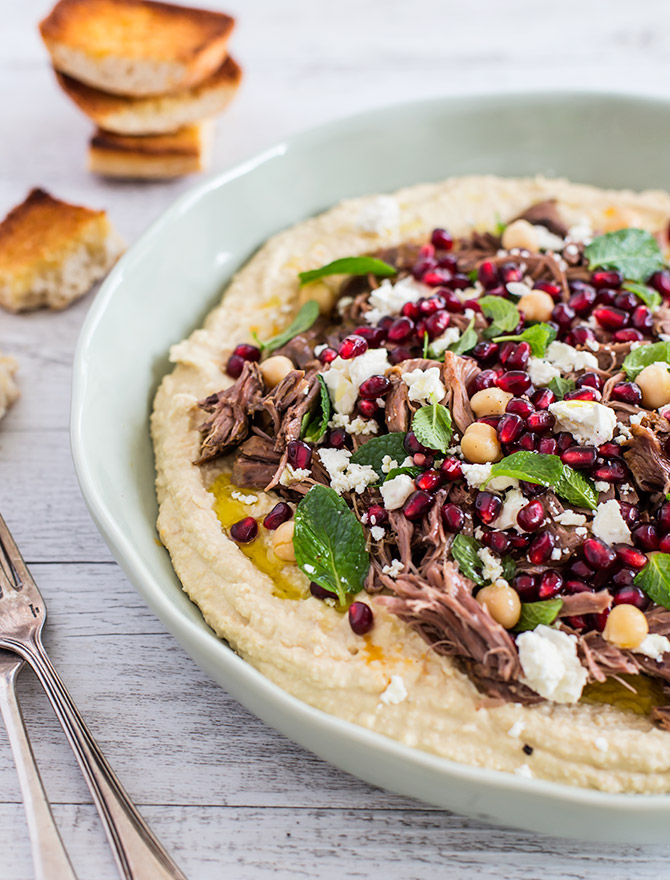
It’s a blank canvas for any number of delicious flavour pairings. This time I decided to serve it with slow cooked lamb and some fresh ingredients like pomegranate, mint and feta, transforming it from ‘just a dip,’ into a delicious main course that would be perfect for sharing. I really love how this came out and will definitely be making it again. I loved that the lamb was cooking away for hours before my guests arrived and the hummus took barely five minutes, so I could enjoy time with my friends and not stress in the kitchen!

Slow Cooked Lamb with Homemade Hummus

Slow Cooked Lamb with Homemade Hummus

Serves 4 (with leftover lamb)

Slow Cooked Lamb

  • 1 tablespoon olive oil
  • 1 onion, diced
  • 3 cloves garlic
  • 1 kg lamb shoulder or leg
  • 2 teaspoons ground cumin
  • 1 teaspoon ground cinnamon
  • 1 teaspoon ground coriander
  • 1/2 teaspoon sumac
  • 1 tablespoon tomato paste
  • 1/2 cup red wine
  • 2 cups beef stock
  • Salt and pepper, to taste

To make the slow cooked lamb, brown off the onion and garlic in a frypan or if you have a Multi Cooker, directly in the bowl on the Saute setting. When starting to soften, add the lamb and brown on all sides. Add to the slow cooker and then add all the spices, tomato paste, red wine and beef stock. Season with salt and pepper and set to slow cook for between 6-9 hours.
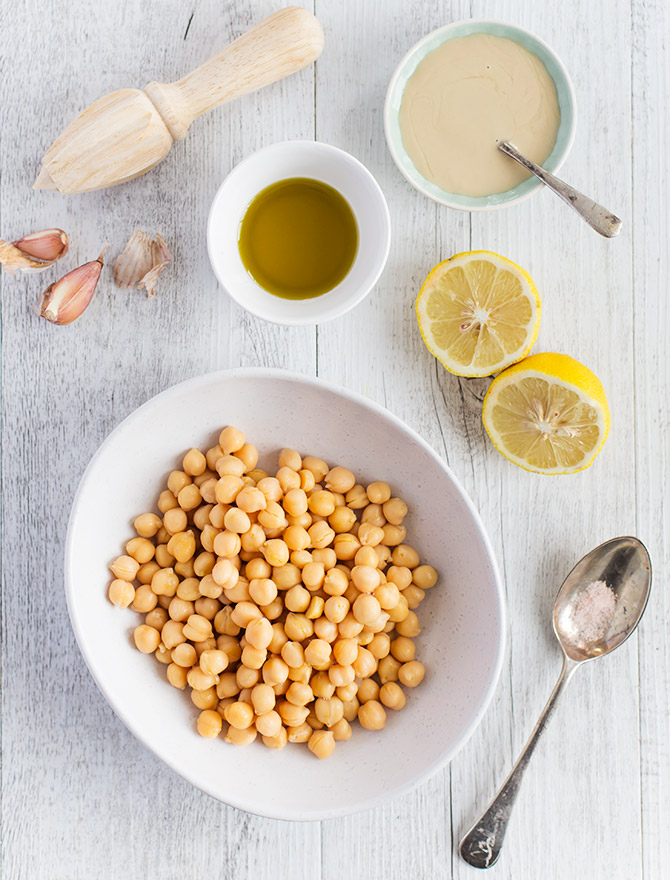
Homemade Hummus

  • 2 cans chickpeas
  • 1-2 cloves garlic
  • 2 tablespoons tahini
  • 2 tablespoons olive oil
  • Juice of 2 lemons
  • Salt, to taste

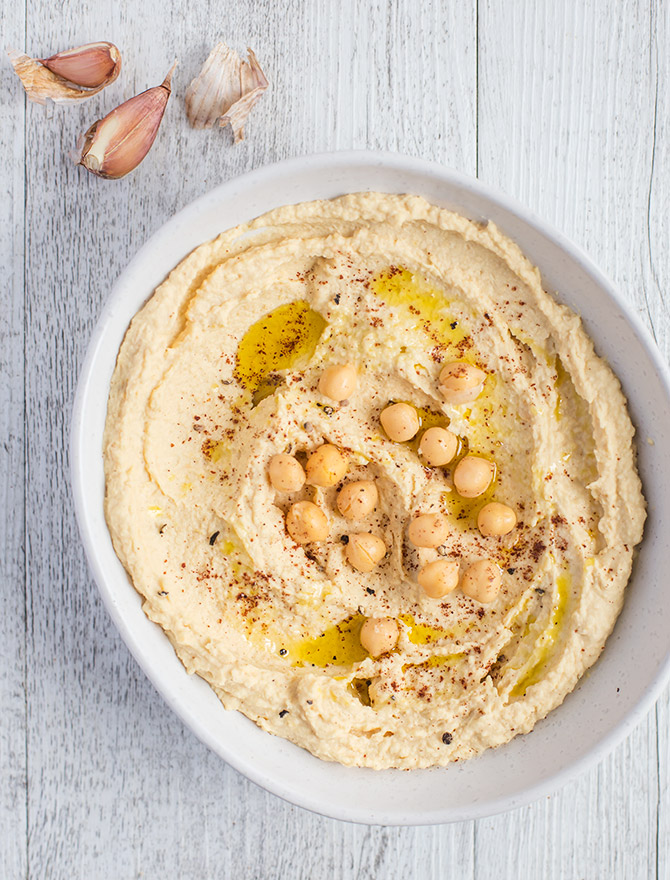
To make the hummus, drain the chickpeas and reserve the liquid. This is called Aquafaba and can be used for many other recipes or as a vegan egg white substitute! Add the chickpeas, garlic, tahini, olive oil and lemon juice to a food processor and blitz. Scrape down the sides, add a little salt and 2 tablespoons of reserved aquafaba. Blitz again until the hummus starts to turn smooth. Taste for seasoning and add a little more salt or lemon juice if you like. I added about 5 tablespoons of aquafaba to reach the thick consistency that I wanted, but keep adding a little at a time and blitz until you are happy with the consistency and texture.

To serve

  • Pomegranate seeds
  • Mint leaves
  • Crumbled Feta
  • Chickpeas
  • Olive oil
  • Salt and pepper, to taste
  • Crusty bread

To serve, transfer your delicious homemade hummus to a large serving dish and with the back of a spoon, swirl around to form little valleys in the surface. When the lamb is ready, taste for seasoning and shred the meat with two forks. Top the hummus with slow cooked lamb and drizzle with olive oil. Scatter the pomegranate seeds, mint leaves, crumbled feta and extra chickpeas over the top. Add some salt and pepper and serve with crusty bread.

Rosé Sangria Popsicles

Rosé Sangria Popsicles
Happy New Year, folks! 2017 was certainly an interesting year, with some massive ups and downs. I love to travel and got to take two incredible trips overseas to the Philippines and Vietnam (which I’ll share more about really soon). I worked with some fantastic hospitality clients on exciting branding, design and photography jobs. I got anxious a lot. I rocked some of my goals and fell way short of others. I learned a lot of life lessons.

But I love the clean slate energy of a new year filled with optimism and possibilities. I’ve spent the last few days doing my favourite thing – setting a couple of business goals, and brainstorming new summer recipe ideas – delicious breakfasts, OTT desserts, simple dinners, healthy snacks, I’ve got you covered!

Rosé Sangria Popsicles
The rise and rise of Rosé is just fine by me. When I’m in the mood, a chilled glass of pink wine always goes down perfectly. I also love it’s summery cousin Frosé, a blended boozy slushie, usually with strawberry or watermelon thrown in the mix. It also makes a great Instagram photo. Back in the day, Gazebo Wine Garden was way ahead of the trend, serving jugs of Rosé Sangria years ago with sliced strawberries, mint and lemon. It was our choice of girly drink on the many, many lunches we had there.

I decided to turn my favourite blush pink beverage into Rosé Sangria Popsicles! Use your favourite bottle of Rosé that you love the taste of because that’s the dominant flavour. I added a little sweetened strawberry puree to taste, but you could also use watermelon or a little simple syrup.

I’ve used sliced strawberries and mint leaves but you could also add blueberries, raspberries, cherries or peach slices. It’s really up to you! It only takes a couple of minutes to put these together (minus freezing time) and couldn’t be more simple. Check out the video above to see how easy it is!

Rosé Sangria Popsicles
These Rosé Sangria Popsicles are a lovely grown-up treat, tinged with childhood nostalgia (I always loved the pink ones the most). They make a super lovely afternoon treat in the summertime. As a kid, I would swim in the pool until my fingers were wrinkly and then buy an ice block for 50 cents. The other day, I enjoyed one of these boozy pops post-beach swim, while watching an incredible sunset that was also fairy floss pink. Perfection!

Related Post: Pavolva Ice Cream Smash

Rosé Sangria Popsicles

Rosé Sangria Popsicles

Makes 10

  • Half bottle Rosé (use your favourite)
  • 100ml strawberry puree
  • 1 punnet strawberries, sliced
  • Mint leaves

Add rosé and strawberry puree to a bowl or jug and stir to combine. Add slices of strawberries and mint leaves to your popsicle moulds and pour the rosé mixture into each. Freeze overnight.

You could also turn it into a granita by freezing the rosé mixture in a shallow pan and freeze for 2 hours. Rake with a fork to break up the ice crystals and return to the freezer. Repeat again in 2 hours and serve with fresh strawberries.

Boozy Rosé Sangria Popsicles

Gingerbread French Toast

Gingerbread French Toast
There’s only a couple of days left until Christmas! I feel pretty good about the state of my gift shopping, but I’ve been terribly indecisive about what to make for our annual family Christmas lunch. Making desserts used to be my thing. It was a way to learn new cooking techniques and use my creativity, and I couldn’t wait to get into the kitchen every weekend to create something new. And for special occasions, there is nothing I love more than bringing a dessert to share with family and friends.

However these days for wacky experiments, interesting food styling and cool flavour combinations, I have been loving making brunch dishes and healthy snacks. Instagram-worthy brunches have been crazy popular in Sydney for the last few years, from interesting twists on the humble pancake, to OTT milkshakes, and smoothie bowls that look like a work of art.

Gingerbread French Toast
Now we are spoiled for choice and can go out for a cafe brunch any day, but there’s something wonderfully nostalgic about waking up early on Christmas Day back at Mum and Dad’s house (now that I’m long moved out) and having a fancy breakfast like we did on special occasions when we were kids. I think it’s a lovely way to start the day around the festive season, taking some time together before the day gets full of activity.

And so I bring you Gingerbread French Toast! I wanted to make a festive brunch dish with warming Christmas spices – fresh and ground ginger, nutmeg, cinnamon, cloves and vanilla bean (my absolute favourite) along with golden syrup and brown sugar for real gingerbread vibes.

Gingerbread French Toast
Fresh berries are a must, especially at this time of year when they are in season and so beautiful. If you are in the northern hemisphere and can’t get hold of fresh berries, I’d recommend turning any frozen berries or cranberries you have into a warm compote with some of the same spices as in the french toast mix and drizzling that over the top – delicious!

I’ve also taken a little inspiration from one of my favourite cafes The Tiny Giant in Petersham and piled this french toast up high with Persian fairy floss. Okay, it’s a little bit extra, but I love it. This French Toast looks so pretty, but it also tastes amazing. Just don’t forget to Instagram it. I also just wanted to wish you all a wonderful Christmas and holiday season! Thank you for supporting this little blog again in it’s 10th year!!

Related Post: Chocolate Spice Gingerbread + 10 Homemade Christmas Gift Ideas
 Gingerbread French Toast

Gingerbread French Toast

Serves 4

  • 8 slices brioche, preferably a day or two old
  • 2 eggs
  • 1 cup cream
  • 1 teaspoon fresh ginger, finely grated
  • 1 teaspoon ground ginger
  • 1 teaspoon ground cinnamon
  • 1 teaspoon vanilla bean paste (or vanilla extract)
  • 1/2 teaspoon ground nutmeg
  • 1/4 teaspoon ground cloves
  • 1 tablespoon brown sugar
  • 1 tablespoon golden syrup or molasses
  • Butter, for frying

To serve:

  • Fresh berries
  • Persian fairy floss
  • Maple syrup

Whisk the eggs and cream in a bowl or jug. Add the fresh and ground ginger, cinnamon, vanilla, nutmeg, cloves, brown sugar and golden syrup. Whisk until combined and then pour into a shallow dish.

Soak slices of brioche in the spiced egg mixture for 30 seconds each side and cook in a pre-heated frypan with a little butter melted. I cooked the slices on a medium heat for about 2-3 minutes on each side.

Transfer to a plate and repeat with remaining slices of brioche. Serve topped with maple syrup, fresh berries and Persian fairy floss.

Gingerbread French Toast

Salted Coconut & Mango No Churn Ice Cream Cake

Salted Coconut Mango No Churn Ice Cream Cake
It’s that time of year again, and I couldn’t be happier. No, I don’t mean Christmas – although stay tuned for some delicious festive recipes coming soon. I mean SUMMER, and my yearly quest to eat as many fresh berries, peaches and mangoes as possible. So far this year, the berries have been excellent, and I’m yet to try the perfect nectarine.

Mango season started earlier than usual, and I got excited and bought a couple of not-yet-perfect specimens. But now the season is in full swing and the fruit is sensational. I’ve said before in another post that I think it’s impossible to be sad while eating a mango, and I truly believe this. If you don’t like mangoes, I’m not sure we can be friends! They are one of my absolute favourite fruits and I love them in all forms.

Salted Coconut Mango No Churn Ice Cream Cake
If you’re from Sydney or Melbourne, you’ll know about Gelato Messina. I think it’s the best gelato in the city, and I love their creative and sometimes wacky flavour combinations. There are rotating weekly specials (usually involving peanut butter) and a stable of crowd-favourite flavours that have stood the test of time. One of these now classic flavours was my first introduction to Salted Coconut Sorbet and I have never looked back.

In the same way that a pinch of salt can temper caramel’s extreme sweetness, and help to bring out the beautiful flavour of dark chocolate, a little Himalayan pink salt in a coconut dessert takes it to the next level. Along with the beautiful in-season mangoes, I’ve combined two of my favourite ingredients into a delicious no churn ice cream cake.

Salted Coconut Mango No Churn Ice Cream Cake
This is a brilliant dessert because it can be made in advance. No churn ice cream is equally perfect for festive entertaining, or served as big scoops in a waffle cone. It looks super pretty with different coloured layers and tastes like summer days.

I used sweetened condensed coconut milk for the first time to make this, which I found with the Asian ingredients in my local Woolworths supermarket. If you can’t find it, just substitute normal sweetened condensed milk and add a little extra coconut extract.

Related Post: White Chocolate and Passionfruit Ice Cream Pie

Salted Coconut Mango No Churn Ice Cream Cake
And here is where I plug my free No Churn Ice Cream ebook, because going into summer is the perfect time to try these super easy and delicious recipes. They honestly couldn’t be easier – there’s no separating eggs, or extra egg whites, no custard, no cooking, and no churning! If you want to make amazing homemade ice cream at home this summer, definitely grab the book for FREE right here.

[convertkit form=4905601]

Salted Coconut & Mango No Churn Ice Cream Cake

Makes about 1 litre, or one loaf size ice cream cake

  • 1 can (390ml) sweetened condensed coconut milk
  • 600ml thickened cream
  • 1/2 teaspoon vanilla extract or vanilla bean paste
  • 1 tablespoon coconut extract
  • 1/4 – 1/2 teaspoon Himalayan pink salt
  • 2 ripe mangoes, roughly chopped
  • 1/2 lime, juice and zest
  • Coconut chips & fresh sliced mango, to garnish

To make the Salted Coconut ice cream, place the condensed coconut milk into a large bowl. Add the vanilla, coconut extract and whisk to fully combine. In a separate bowl, whip the cream to form soft peaks. Fold the cream into the condensed milk with a spatula until incorporated. Separate 1/3 of the mixture into another medium sized bowl.

Add salt to the remaining 2/3 of the mixture, starting with 1/4 teaspoon and then taste and add a little extra salt or coconut extract if you like.

Combine the chopped mango, lime juice and zest in a food processor or blender until liquid. Stir into the reserved 1/3 of the condensed milk mixture.

Layer the ice cream in a loaf pan starting with coconut mixture, and freezing for 20-30 minutes before adding a layer of mango mixture. Repeat until pan is full. Freeze until firm, preferably overnight. To serve, top with fresh mango and coconut flakes and cut into slices.

Note: This ice cream does set quite solid so I would recommend bringing it out of the freezer 5-10 minutes before serving and using a knife dipped in hot water to cut nice clean slices.

Matcha Coconut Bounty Bites

Matcha Coconut Bounty Bites
I’ve always loved creating twists on childhood treats. It’s a fantastic way to use my creativity to put my own spin on a classic recipe and give a nostalgic favourite a new lease on life. Often in the past that has meant adding some booze or going way over the top (hello Fairy Bread Cake, I still love you). But today I’m going the opposite way and creating a healthier version of one of my absolute favourite chocolate bars – the Bounty Bar.

Coconut and milk chocolate, how can you go wrong? My whole family has loved these chocolate bars for as long as I can remember. But when I had one a few months ago, it didn’t quite live up to my memories. It tasted overly sweet, a little artificial, and I decided to try out a homemade alternative. My version uses 70% dark chocolate and one of my other favourite ingredients – matcha green tea.

Matcha Coconut Bounty Bites
I first cooked with matcha shortly after I started this blog, about 10 years ago (I certainly can’t believe it) and it is very Insta-popular at the moment. Matcha lattes and emerald green desserts and even breakfasts are popping up on restaurant menus all over Sydney. But it’s not just pretty, it’s also incredibly good for you!

Matcha is a special kind of tea high high in polyphenols, chlorophyll, antioxidants and amino acids, which have loads of health benefits for your heart, liver, immune system, energy levels, metabolism and more. Only the smallest, youngest leaves are selected, then steamed and finely milled to preserve the flavour and nutritional content. Matcha has been used in Japan and China for centuries as a medicine and in traditional tea ceremonies, but you now commonly see it used in western countries as a cooking ingredient.

Matcha Coconut Bounty Bites
What I love about this snack is that it ticks all the ‘treat’ boxes, while getting in some good fats from the coconut and coconut oil. It uses only a little fructose free sweetener and has antioxidants from the matcha and dark chocolate. They take about 5 minutes to make in the food processor and then a short time in the freezer to set. There’s no baking or rolling involved – while I love Bliss Balls, they can get messy!

The Matcha Coconut pairing is absolutely beautiful in both taste and looks, and is taken to the next level by the dark chocolate drizzle. I definitely love this combination of ingredients! They can also be easily adapted to be completely vegan by switching the chocolate to a brand like Loving Earth.

Matcha Coconut Bounty Bites
I also loved that you can pop a few of these into a zip-lock in your handbag for a snack on the go. I took them on the plane with me to Manila recently. Actually, it was a funny story. I packed these bars and some raw nuts in an attempt to avoid plane food and eat healthily but when I got on board I found Unicorn Bagels. with cream cheese and sprinkles. I couldn’t resist…

You can use as much or as little matcha powder as you want, depending how intense you’d like the flavour to be. As always, I like my recipes to act as a starting point for your own creativity, so instead of the matcha, you can use anything else that takes your fancy. Acai powder would turn the bars a beautiful shade of magenta, and I saw lots of freeze dried fruit powders available in the gourmet grocery the other day – everything from blueberry to passionfruit. Yum!

Matcha Coconut Bounty Bites

Matcha Coconut Bounty Bites

The Matcha Coconut pairing is absolutely beautiful in both taste and looks, and is taken to the next level by the decadent dark chocolate drizzle.

Course Dessert
Keyword Dessert, Healthy Recipes, Snack
Prep Time 20 minutes
Freeze 45 minutes
Total Time 1 hour 5 minutes
Servings 16 servings

Ingredients

  • 3 cups shredded coconut
  • 1/2 cup rice malt syrup
  • 2 tablespoons coconut oil
  • 1 teaspoon vanilla extract or vanilla bean paste
  • 2 tablespoons coconut cream
  • 1-2 tablespoons matcha green tea powder
  • Dark chocolate, to drizzle (use your favourite!)

Instructions

  1. Place the coconut, rice malt syrup, coconut oil, vanilla and coconut cream into the bowl of a food processor and pulse until the mixture is roughly chopped and comes together.
  2. Remove half of the mixture and press evenly into the base of a non-stick square removable bottom cake tin, using a spoon to flatten the top. You can also use a brownie tin lined with non-stick baking paper.

  3. Add the matcha to the remaining coconut mixture and process again to combine. Press the matcha coconut mixture on top of the other layer.
  4. Freeze for about 30 minutes. When mixture has set, cut into squares (mine made about 16) and arrange onto non-stick baking paper.
  5. Melt your dark chocolate and drizzle over the coconut bites with a teaspoon, or if you like, you can dip the squares into the chocolate using 2 forks. Return to the freezer for 10-15 minutes our until the chocolate has set. You can store these in an airtight container in the fridge or freezer for up to 4 weeks, but I doubt they will last that long!

Warm Chocolate Chia Porridge Two Ways

Warm Chocolate Chia Porridge
Here in the southern hemisphere, we are deep into winter weather now. One thing I do love about winter in Sydney is that we still get beautiful sunny days and I love spending the morning in the garden. It’s fantastic to get some much needed Vitamin D and catch up on my emails, but the early mornings and evenings are dark and super chilly.

For me that means perpetually cold hands – an excuse to wrap them around a warm mug of tea – and most of all I want comfort food. The slow cooker gets a good workout (stay tuned for a delicious slow cooked recipe up next week) and I find myself craving warm dishes for every meal. But winter comfort food seems to be so intrinsically tied with carbs, so I have been trying to find healthier alternatives that still warm me up from the inside out and don’t feel like I am depriving myself.

Warm Chocolate Chia Porridge
Soups, roasted vegetable salads and lighter pasta dishes made with cauliflower or zucchini noodles are all on the menu this week. When the mornings are so cold, porridge used to be one of my go-to breakfast options. This chocolate chia porridge is an absolutely fantastic breakfast that ticks all the boxes for health and has the same amount of comfort food charm as a warm bowl of porridge.

Chia seeds are a great little super food that I have been including in my diet for about 2 years. They are incredibly high in fibre – great for your digestion – and a great plant source of Omega-3 fatty acids and protein, which makes this a nice filling breakfast.

The cacao powder makes it feel like you’re eating chocolate for breakfast, which suits me fine! Cacao is a fantastic source of polyphenols which have strong antioxidant properties, help to balance your hormones and lower your blood pressure.

Warm Chocolate Chia Porridge
I’ve made this quite a few different ways over the last few weeks, but these two have been my favourites. I love adding peanut or almond butter and coconut flakes for some extra healthy fat on top and whatever fruit I have on hand. I would happily eat the Peanut Butter and Banana version for dessert. The Raspberry and Pomegranate version reminds me of a cherry ripe. This recipe is a blank canvas to add any of your favourite healthy toppings. Many great flavours go so well with chocolate, so make it your own.

Another great thing about this recipe is that I tested it two ways. Making the chia pudding the night before and heating it in the microwave for a breakfast that takes about 1 minute flat on a busy morning. You can also make it in a saucepan on the stove in about 5 mintues.

Either way, the result is quick, healthy and delicious. I will also quickly add that I as I write this, I am eating a warm version of my Coconut & Blueberry Chia Pudding complete with homemade chia jam and that is absolutely delicious too.

Warm Chocolate Chia Porridge

Warm Chocolate Chia Porridge

This is the base recipe for both kinds. Makes 2 servings.

  • 1 cup Coconut & Almond Milk (or non-dairy milk of your choice)
  • 2 tablespoons chia seeds
  • 1 1/2 tablespoons cacao powder, sifted
  • A few drops Stevia or 1-2 teaspoons rice malt syrup
  • 1 teaspoon vanilla extract

Banana & Peanut Butter Chocolate Chia Porridge

  • 1 tablespoon peanut butter
  • 1 tablespoon mixed seeds of your choice
  • 1/2 banana, sliced

Raspberry & Pomegranate Chocolate Chia Porridge

  • 1 tablespoon pomegranate arils
  • Fresh raspberries
  • Handful of coconut flakes

To make the Chocolate Chia Pudding the night before, combine the Almond & Coconut Milk together with the chia seeds, cacao powder, sweetener of your choice and vanilla in a glass jar with a lid. Cover and shake well, set aside for 15 minutes. Give it another good shake then refrigerate 5-6 hours or overnight. In the morning, place into 2 bowls and microwave for 1 minute. Add your desired toppings.

To make the Chocolate Chia Pudding in the morning, combine the Almond & Coconut Milk together with the chia seeds, cacao powder, sweetener of your choice and vanilla in a small saucepan over medium heat and cook, stirring for about 5-8 minutes until mixture is warmed and thickened. Place into 2 bowls and add your desired toppings.

Warm Chocolate Chia Porridge

Healthy Homemade Snacks – Cashew and Maca Bliss Balls

Cashew and Maca Bliss Balls
Whenever I get super busy, without fail, this blog is the first thing to fall by the way-side. Which is terrible, because after almost ten years of blogging, I still love coming here to share my current favourite recipes and brand new discoveries with you.

Unfortunately, the second thing to suffer is my healthy eating habits. If I have a deadline and don’t have time to walk to the supermarket, it’s pasta for dinner again. If I don’t have a healthy snack with me while I’m running between meetings and photo shoots, I eat something full of sugar and then spend the next few days craving other naughty things.

I’m sure I’m not alone in making bad decisions when I’m hangry.

Cashew and Maca Bliss Balls
I’ve made Bliss Balls a couple of times since I first posted about them, with different combinations of nuts and flavours each time, but this version is a winner. I’ve been using the new-to-me ingredient Maca in my smoothies lately because it has a tremendous amount of health benefits and a nutty toffee taste. It pairs particularly well with bananas, cinnamon and most kinds of nuts.

What the heck is Maca? Yes, it’s another so-called super food, but it is definitely a nutrition powerhouse. It comes from a root vegetable and is part of a family called Adaptogens, which help your body to deal with external stressors and to balance hormones in both males and females (especially for women suffering from PCOS).

I was most interested in claims that this amazing ingredient also improve your mood, helps memory and energy and especially to ease stress and anxiety. A year ago I had never even heard of it, but it’s now widely available at most health food shops.

Cashew and Maca Bliss Balls
Also on my radar are healthy fats, which I have been trying to eat more of lately. Coconut oil, of course, and cashews are an amazing source of unsaturated fatty acids and heart-healthy monounsaturated fat. They also contain high amounts of Vitamin E, magnesium, copper and other important minerals. As much as I love cashews, these bliss balls would work with almost any kind of nut, so use your favourite.

Bliss balls seriously could not be simpler to make. Just dump everything into a food processor until combined and then roll into balls. The Medjool dates and fructose-free rice malt syrup help to bind the sweet nutty mixture together. In less than five minutes, you’ve made a week of healthy and delicious snacks that can be eaten on the go – it doesn’t get better than that!

Cashew and Maca Bliss Balls

Cashew and Maca Bliss Balls

Cashew and Maca Bliss Balls

Cashew and Maca Bliss balls could not be simpler to make. In less than five minutes, you’ve made a week of healthy and delicious snacks that can be eaten on the go – it doesn’t get better than that!

Course Snack
Keyword Healthy Recipes, Snack
Prep Time 5 minutes
Servings 9 bliss balls

Ingredients

  • 1 cup raw unsalted cashews, or your favourite nut, or a mixture
  • 1 cup pitted Medjool dates
  • 1 tablespoon rice malt syrup or maple syrup
  • 1 tablespoon maca powder
  • 1 tablespoon coconut oil
  • 1 teaspoon ground cinnamon
  • 1/2 teaspoon vanilla extract or paste
  • Pinch of sea salt

Instructions

  1. Place all ingredients into the bowl of a food processor and pulse until fully combined. Roll into balls with your hands. Keep refrigerated until ready to eat.

Sticky Date Rolls with Salted Caramel Sauce

Sticky Date Rolls with Salted Caramel Sauce
Hot Cross Buns have been in the shops since Boxing Day – literally – but I haven’t had a single one yet. I’ll admit to a little prickle of indignation every time I saw them before Easter season began. I think they’re much more special when enjoyed for a week or two, and then put away until the next year. Hot Cross Buns are a recipe I haven’t quite perfected a homemade version of yet. My attempts have been quite delicious, but just a little dense and heavy for my liking. But I make a damn good cinnamon roll.

Maybe it’s the change of season from summer into autumn, but this time of year seems to bring out a craving for cozy times in the kitchen. I love waking up early to bake, kneading dough and smelling warm spices. It puts me in such a good mood and reminds me of the early years of blogging when I would do this almost every weekend in my old kitchen. I can hardly believe that Spicyicecream is 10 years old in July!

Sticky Date Rolls with Salted Caramel Sauce
This time I decided to change up my usual recipe to make Sticky Date Rolls, with delicious consqeuences. I’ve included some delicious tea-steeped dates in the spiced filling. Medjool dates are also one of my favourite snacks these days with an amazing earthy caramel taste. If you’ve been reading for a while, you may know that Sticky Date Pudding is one of my favourite desserts in the world, and it seems to be a yearly tradition to experiment with it.

Another small change I made this time was to use about 1/3 rye flour in the mixture, which I think turned out really well but I have noted it as optional in the recipe below. I have been loving experimenting with alternate flours and sugars in recent times and can’t wait to share more of these recipes with you here on the blog.

Sticky Date Rolls with Salted Caramel Sauce
The obvious accompaniment is a delicious caramel sauce, which I felt would suit these little rolls better than a liberal dusting of icing sugar or a super sweet glaze. I drizzled it over the top while the rolls were still warm, and then served them with a little extra for good measure. These sticky date rolls are best served fresh on the day they are made, but can also be frozen and reheated in the oven for a decadent Easter morning breakfast.

Related Post: Sticky Date Doughnuts

Sticky Date Rolls with Salted Caramel Sauce

Sticky Date Rolls with Salted Caramel Sauce

Makes 16

Dough

  • 1 cup milk
  • 45g unsalted butter
  • 1 cup rye flour
  • 2 ½ cups plain flour
  • ½ cup sugar
  • 1 large egg
  • 2 ¼ teaspoons rapid-rise yeast
  • 1 teaspoon salt
  • Vegetable oil spray

Filling

  • 2 cups pitted dates
  • 2 earl grey teabags
  • Boiling water
  • ¾ cup brown sugar
  • 1 tablespoon ground cinnamon
  • 1 tablespoon ground ginger
  • 55g unsalted butter, room temperature

Salted Caramel Sauce

  • 1/2 cup brown sugar
  • 30g salted butter
  • 1/2 cup cream
  • 3/4 teaspoon sea salt

To make the dough, combine milk and butter in a microwave safe cup or bowl. Microwave on high for 30-45 seconds, until butter melts and mixture is warm. Pour into the bowl of a stand mixer fitted with the paddle attachment. Add rye flour, sugar, egg, yeast and salt. Beat on low speed for 3 minutes, scraping down the sides of the bowl as necessary. Add remaining 2 ½ cups flour and beat on low speed until flour is absorbed. If dough is very sticky, add flour one tablespoon at a time until dough begins to form a ball and pulls away from the side of the bowl.

Turn dough out onto a lightly floured surface. Knead until smooth, adding more flour if sticky, for about 8 minutes. Form into a ball. Lightly oil a bowl with non-stick spray. Transfer dough to the bowl and cover with plastic wrap, then a tea towel. Let dough rise in a warm place for about 2 hours, or until doubled in size.

In the meantime, roughly chop the dates and place them into a bowl with the tea bags and a little boiling water. Allow to steep and cool for at least an hour. Strain the date mixture, removing the tea bags and pressing down on the dates to remove as much liquid as possible.

To make the filling, mix brown sugar, cinnamon and ginger in a medium sized bowl. Punch the dough down and transfer to a floured work surface. Roll out a 30x40cm rectangle. Spread butter over the dough, leaving 1.5cm border. Sprinkle the spiced sugar evenly over the butter. Spread the date mixture over the spice mixture. Starting at a long side, roll the dough into a log. With seam side down, cut dough crosswise with a thin sharp knife into 16 equal slices.

Spray a large rectangular baking dish with non-stick spray. Divide rolls between baking dishes, arranging with cut side up. Cover with a tea towel and let dough rise for 40-45 minutes, until almost doubled in volume.

Preheat to 190°C (375°F). Bake for about 20 minutes, until the tops are golden. Remove from oven and invert immediately onto a wire rack. Cool for 10 minutes, then turn rolls right side up.

To make the salted caramel sauce, place the brown sugar, butter and cream into another small saucepan and stir until combined and the butter has melted. Cook over a medium heat for 5-10 minutes until slightly thickened. Stir through salt and allow to cool to room temperature. Drizzle over the warm sticky date rolls and serve extra on the side.

Sticky Date Rolls with Salted Caramel Sauce

Homemade Tomato and Chilli Jam

Homemade Tomato and Chilli Jam
There’s nothing better than farmers market Saturdays. But for me, this time of year – late summer, early autumn here in Australia – is my absolute favourite. You can find everything from stone fruit to berries, to the first apples and pears of the season, to eggplants, herbs and tomatoes of all shapes and colours. I love wandering around with my basket, picking up anything that looks exciting, nibbling on a sample of something tasty and taking an Instagram of the pretty flowers.

I find it all super inspiring and always come home with a bag full of beautiful produce and lots of great ideas of what to make. This time of year is also perfect to preserve the best of summer’s bounty. Last weekend it was the tomatoes that really spoke to me. I decided to try something I’ve never made before – a tangy, sweet and spicy homemade tomato and chilli jam.

Homemade Tomato and Chilli Jam
A lot of people that I’ve talked to are resistant to the idea of making jam from scratch for many reasons. I know that it did take me a while to face my fear of sterilising jars, but after almost seven years of homemade jam, I’ve never looked back.

You don’t need a surplus of homegrown fruit.
You don’t need to spend an entire weekend making jam for the whole neighbourhood.
You don’t need to add a ton of sugar.
You can sterilise jars quickly, safely and easily.
You don’t have to buy poor quality overly sweet store bought jam.
You don’t have to buy expensive artisan jam. Well you can, but it’s more fun to make it yourself!

Homemade Tomato and Chilli Jam
Until now, I have only made jam with traditional jam-making fruits like berries, rhubarb and figs. Even though I’ve been purchasing store-bought tomato relish for years, I had never made a savoury jam with tomatoes, ginger, vinegar and garlic. But the process is very similar – fruit (tomato is a fruit!), flavourings, sugar and acid simmer together to thicken up and produce a delicious result. This recipe makes about 3 jars of jam (which I think will last us about 3 months) but feel free to halve it or scale it down if you want to make a smaller batch.

Well, this tomato and chilli jam is super delicious! At first I thought it was a little bit sweet on its own but once I tried it with other foods I thought it was perfectly balanced. I think a savoury jam like this is so versatile! It would be perfect on almost any kind of burger, with bacon and eggs or on a steak sandwich or the best ham and cheese toastie of your life. I love that it’s a little bit spicy, a little bit tangy and a little bit sweet.

Homemade Tomato and Chilli Jam
Next time I make this (because there will definitely be a next time) I want to experiment with roasting the tomatoes first to see if that gives the jam a more intense and concentrated tomato flavour. Feel free to experiment with making it more or less spicy to suit your own personal taste. I absolutely love that you can preserve the best of summer’s produce in just over an hour to give you endless opportunities for deliciousness.

Related Post: Homemade Jam with Free Printable Labels

Homemade Tomato and Chilli Jam

Homemade Tomato Chilli Jam
Homemade Tomato and Chilli Jam
4.84 from 6 votes
Print

Homemade Tomato and Chilli Jam

Sweet and spicy homemade tomato and chilli jam, perfect on sandwiches, burgers, toasties, with bacon and eggs or cheese and crackers.

Course Jams & Preserves
Keyword Jam, Summer
Prep Time 30 minutes
Cook Time 1 hour 30 minutes
Total Time 2 hours
Servings 3 cups

Ingredients

  • 1 kg ripe tomatoes, coarsely chopped
  • 1 3/4 cup caster sugar
  • 1/3 cup white wine vinegar
  • Juice of 1 large lemon, or 2 small ones
  • 5 fresh long red chillies, sliced thinly
  • 2 teaspoons finely grated ginger
  • 3 cloves garlic, sliced thinly
  • 1 tablespoon fish sauce
  • 1 teaspoon coarse salt

Instructions

  1. This recipe is best using the ripest tomatoes you can find. Place all of the ingredients in a large saucepan over high heat, stir without boiling until sugar has dissolved. Bring to the boil and then reduce heat, simmer, uncovered, stirring occasionally for about 90 minutes or until jam is thick.
  2. Cool for 15 minutes. You can blend this jam for a smooth consistency, but I left it as is with a great relish texture.
  3. To sterilise the jars, wash the jars and lids with hot soapy water, rinsing thoroughly. Place into a 120°C (250°F) oven for 30 minutes or until they are hot and dry. Remove from the oven carefully and pour the hot jam into the jars and seal immediately.
  4. If you make jam regularly, it’s always a good idea to label and date your jars so you can keep track of when to use them. Store in a cool, dark place and refrigerate when opened. Jam will keep for about 3 months.

Recipe Notes

Adapted from Women’s Weekly ‘Made From Scratch’

Pretty Party Iced Tea Punch

Pretty Party Iced Tea Punch
I have a little confession to make. I haven’t been drinking much lately, like almost at all. It’s not like I was ever an excessive drinker, but I used to love winding down after work with a glass of red wine. I’ve never been keen on doing Feb Fast or Dry July. And if I want a drink, like a chilled glass of Rosé on a warm night, I’ll surely have one. But I haven’t wanted one. Pinot Noir used to be my favourite, but I can tell you the last time I had a glass was in 2015.

At first I thought it was weird – I was the boozy desserts girl after all – but then I realised this is just a season in my life, and it’s completely fine. But I do still love creating cocktails because I love experimenting with flavours. I’ll just share it with my housemate afterwards!

Today I want to share one of my favourite things to make when I have guests – this super pretty Party Iced Tea Punch. It is a total crowd pleaser. I first made this for a Christmas lunch with my girl friends, where one was a new Mum and the rest were driving. So I was looking for a drink that we could share that wasn’t Pimm’s or Sangria (our usuals). And this iced tea punch was born.

Pretty Party Iced Tea Punch
I love that this ‘recipe’ is super versatile. You can make it with booze or without (it’s good both ways, I promise) and use different kinds of tea depending on your taste, and whatever berries and fruit you like. I’ve made it in a pitcher to serve 2 or 3 and also in my big trifle bowl for a bigger crowd. It’s a winner. Promise.

The secret weapon in this punch is the lychee berry ice cubes. I’ve talked before about flavoured ice cubes as a revelation to keep your drink cold but not diluted. In fact because the ice cubes are made with lychee juice, the drink gets even more and more delicious as they begin to melt. They make your drink look so pretty and are the easiest thing in the world to make the night before you are having guests.

Pretty Party Iced Tea Punch
Now lets talk about tea. This post is not sponsored but I have to say that T2 has been making some of the most delicious and interesting teas in Australia for the last few years. I’ve made this punch with both Ayurvedic Passion (the best smelling tea ever) and Green Rose (the second best) – both delicious. You can use whatever you like, but I’d definitely recommend a green tea base over black tea so your delicate fruit flavours can shine through. Bonus points if your tea has some delicious flower or fruit profiles in it too.

In the punch I also used extra berries (frozen are totally fine here!) as well as lychees, apple slices, mint leaves and topped up with soda or lemonade for a little extra sweetness. And, if you’re looking for a boozy version, Hendricks gin has notes of rose and cucumber and works really well here. Every time I have made this Iced Tea Punch it has been a total crowd pleaser, so I hope you try it the next time your girl friends come over.

Related Post: The Garden Party Cocktail

Pretty Party Iced Tea Punch


Pretty Party Iced Tea Punch

This super pretty Party Iced Tea Punch is a total crowd pleaser. It can be made with booze or without, so it's perfect for Hens Parties, Baby Showers, Kitchen Teas or a just lunch with the girls!

Course Drinks
Keyword Cocktails, Drinks, Spring, Summer
Prep Time 30 minutes
Freezing Time 6 hours
Servings 3

Ingredients

Lychee Ice Cubes

  • 1 can lychees in juice
  • Fresh or frozen raspberries
  • Mint leaves

Iced Tea

  • 3-4 tablespoons loose leaf green tea of your choice
  • 60 ml gin (optional)
  • Fresh of frozen raspberries
  • Mint leaves
  • 1/2 green apple, sliced with a mandoline
  • Lemonade or soda, to top up

Instructions

  1. To make the lychee ice cubes, I used a large six square cube ice cube tray. Place 1 lychee and a few raspberries and mint leaves into each ice cube and top up with lychee juice. Place in the freezer overnight.
  2. To make the iced tea, brew your green tea with boiled water at least 2 hours in advance. I use a 4 cup teapot. I also like to do this the night before because I love my tea strong.

  3. When your guests arrive, fill your pitcher halfway with cooled green tea. My pitcher is 1.5L. Add the gin if using, extra raspberries, mint leaves, green apples, and ice cubes. Top up with lemonade or soda and give it a stir with the end of a wooden spoon to evenly disperse the fruit. Serve immediately.

Recipe Notes

Serves 2-3 but can be scaled up

Pretty Party Iced Tea Punch