Crumbed Feta with Roasted Grapes and Honey

Crumbed Feta with Roasted Grapes and Honey

I had to dig out a cardigan the other night, so autumn must be on the way here in Sydney. This is actually my favourite time of year. I love going out for a walk when the morning air is crisp and cool, but warms up into a beautiful sunny day. Plus, I loooove cardigans. The change of seasons always brings me cooking inspiration and I’ve been happily brainstorming cool-weather comfort food dishes. I was very excited about one particular idea and couldn’t help but try it straight away – Crumbed Feta with Roasted Grapes and Honey.

I’ve made a lot of cheeseboards in my time. I love the process of putting them together and styling everything beautifully. Cheese, grapes and honey are staples and a delicious combination of flavours together, but this is a unique and totally delicious way to serve them. With this dish, I wanted to elevate your standard cheeseboard and give it a seasonal autumn twist. Just add a glass of wine!

Crumbed Feta with Roasted Grapes and Honey

Have you ever tried roasted grapes? 

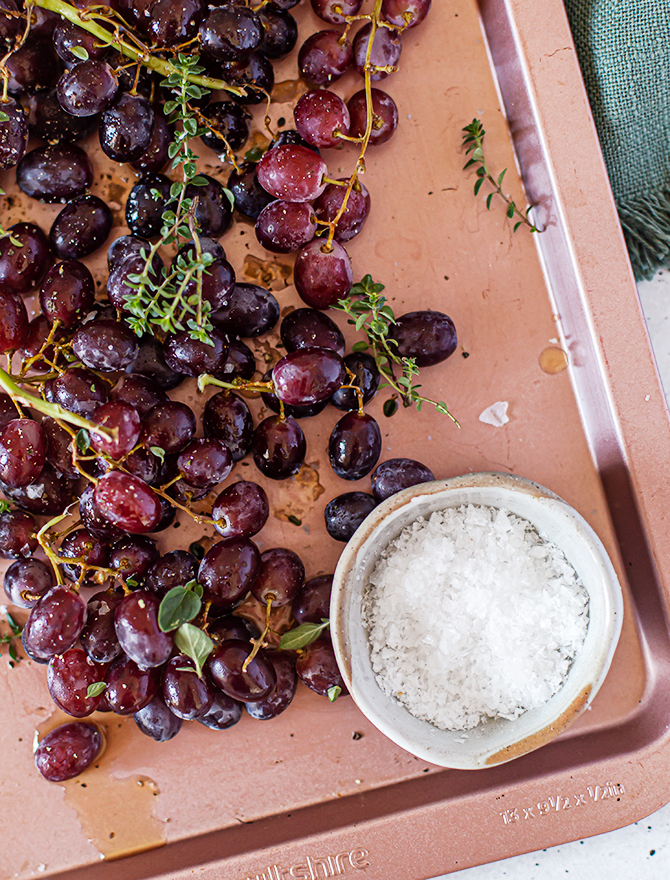
Just like roasted strawberries, a little time in the oven turns red grapes into an even more delicious version of themselves. The flavour and sweetness gets super concentrated. Grapes are in season right now and super affordable so it’s the perfect time to give this recipe a try! I kept the grapes on the stalks for my photos (#aesthetics) but honestly it would be much easier to eat if they were removed before cooking!

Crumbed Feta with Roasted Grapes and Honey

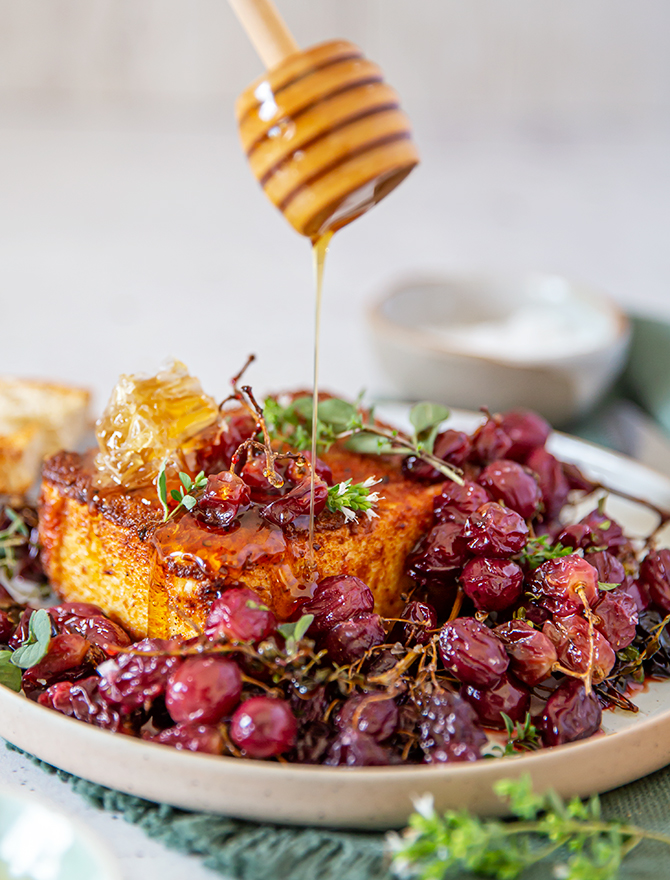
Feta is such a versatile cheese to use in a wide variety of dishes. The whole internet has gone feta mad thanks to the viral TikTok pasta recipe! I love it crumbled over roasted carrots or in salads, but I had never tried crumbing and frying it before! The pan-fried crumb coating becomes golden and crisp, adding a lovely textural contrast. The cheese inside doesn’t melt, but becomes creamy and crumbly and is so delicious served warm.

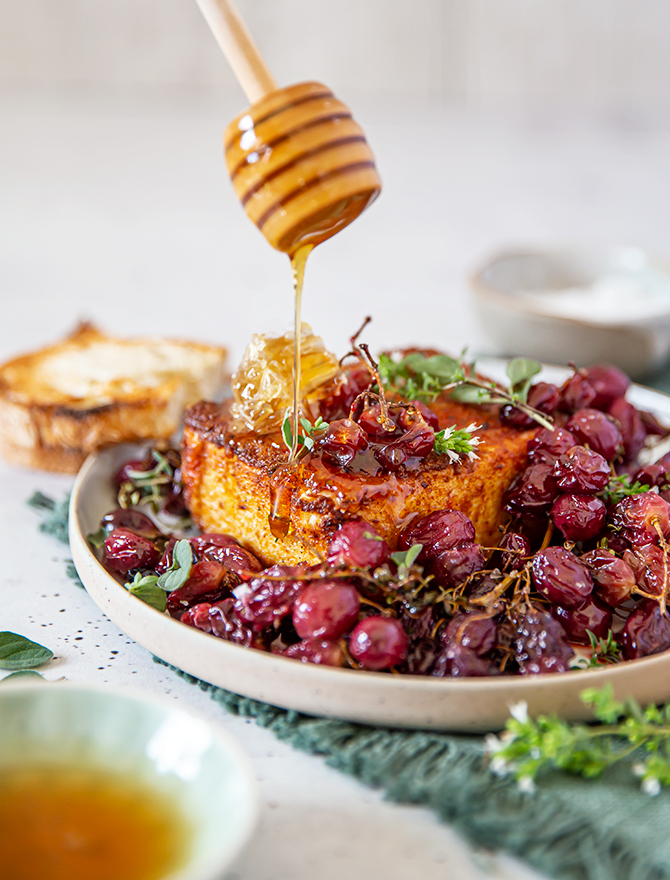
The grapes and honey add sweetness that offsets the salty crumbed feta beautifully. The fresh thyme and oregano add a pop of contrasting colour and lovely flavour.

Crumbed Feta with Roasted Grapes and Honey

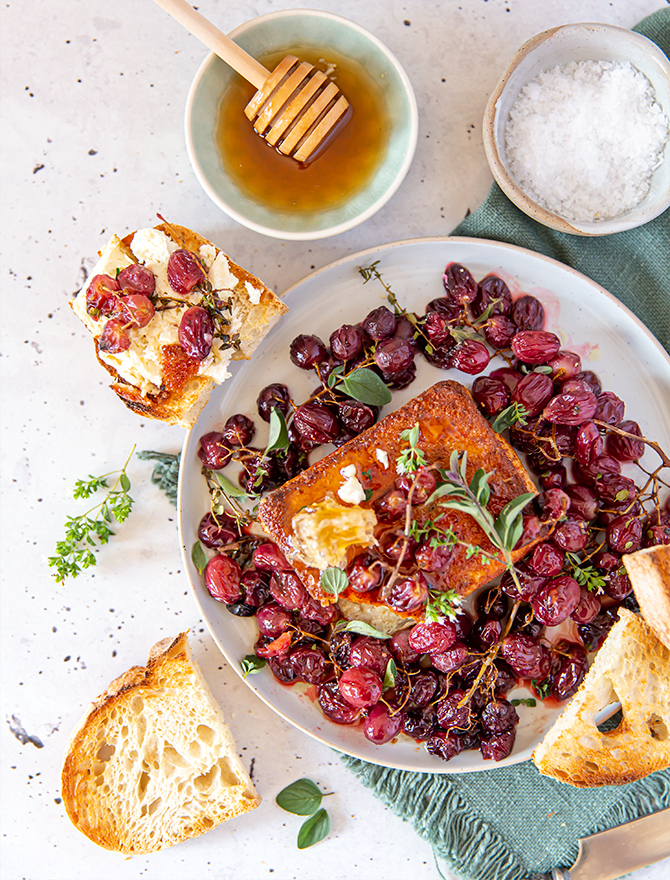
I served the feta as one big block, crumbed and fried until golden. You could also cut into smaller pieces. This will help to get a better crumb to cheese ratio and individual pieces might be better for a larger group. Just make sure to serve with crusty toasted bread or crackers! 

This Crumbed Feta is so quick and easy to prepare – like 20 minutes, tops – but really takes your cheeseboard to a whole new level. It’s also a great little vegetarian appetiser that can be adapted through the seasons all year. Think fresh cherry tomatoes or sliced peaches in summer with scattered basil and mint leaves. I’d also love to try a wintery version with roast pumpkin, sage and toasted pine nuts. You can also try it with olives, figs and pomegranate or any other flavour combination you dream up!

Related Post: Slow Cooked Lamb with Homemade Hummus

Crumbed Feta with Roasted Grapes and Honey

Crumbed Feta with Roasted Grapes and Honey

This Crumbed Feta is so easy and takes your autumn cheeseboard to a whole new level. The salty, crispy cheese goes perfectly with the sweet grapes and honey!

Course Appetizer, Side Dish
Keyword Autumn, Side Dish, Simple Dinners, Vegetarian
Prep Time 20 minutes
Cook Time 20 minutes

Ingredients

Roasted Grapes

  • 1/2 bunch grapes, picked off the stalks
  • 1 tablespoon olive oil
  • Salt & Pepper
  • A few sprigs of fresh thyme
  • 1 block Danish fetta
  • 1 egg
  • 3/4 cup breadcrumbs (panko or regular)
  • Big pinch flaky salt
  • 4-5 tablespoons olive oil
  • Honey, to serve
  • Fresh oregano and thyme, optional, to serve
  • Crusty bread, toasted to serve

Instructions

  1. Preheat oven to 180°C (350°F). Place grapes in an even layer on a baking tray and drizzle with olive oil. Scatter with salt, pepper and thyme leaves. Roast for 15-20 minutes until the grapes are softened and have released some juice.
  2. In the meantime, make the crumbed feta.
  3. Place the egg into a flat-bottomed bowl and whisk lightly. Add the breadcrumbs and a big pinch of salt to a second bowl. Dip the feta into the egg and then transfer to the second bowl. Press gently into the bread crumbs on all sides to evenly coat.
  4. Heat olive oil in a fry pan over medium heat. Cook the feta for about 3 minutes each front and back and then carefully turn to cook the other sides until golden brown.
  5. Transfer to a plate to serve. Place roasted grapes around and on top of the feta, spooning over the grape juices. Scatter with fresh oregano and thyme. Serve immediately with a good drizzling of honey and toasted bread.

Spiced Nectarine Chilli Chutney

Spiced Nectarine Chilli Chutney

I’m here today with a recipe that should definitely be the newest addition to all your future cheese boards – Spiced Nectarine Chilli Chutney! Jam is my jam, but I also love trying other kinds of preserving.

This recipe was born out of an abundance of homegrown chillies and my well-established love of summer stone fruit. I’ve been wanting to make chutney for a while now, and nectarine and chilli sounded like the perfect flavour combination to try. I love that sweet-tart chutney can take a boring sandwich or simple ham and cheese toastie to a whole other level.

So, what’s the difference between a jam and a chutney?

Honestly it gets a little tricky here and I’ve spent the last 30 minutes trying to work it out. 

Very basically, jam is a sweet preserve and chutney is more savoury. It’s sometimes spicy, and often (but not always) contains vegetables, plus vinegar and spices. I’ve seen chutney made with so many different ingredients – from mint, coriander, dates, coconut, onion and chillies to things like tart apple, rhubarb, quince, mango, eggplant, tomato, dried fruit and so many more. 

Spiced Nectarine Chilli Chutney

Chutney originated in India but soon spread around the world. It is a condiment used to complement a meal like a little flavour bomb. Some chutneys are traditionally made to pair with curries, but others go perfectly on sandwiches, or with cheese and cold meats.

This may be controversial, but when I think about the flavour profiles of a jam vs a fruit or vegetable based chutney, the difference is white sugar vs brown sugar. If I was making a nectarine jam vs a nectarine chutney, I would approach them quite differently. Even thought the base ingredient is the same, the supporting players would change and the end result would be very different. 

Even though my Tomato and Chilli Jam contains vinegar, the white sugar gives it an overall sweeter flavour profile. This nectarine chilli chutney has sweetness from the brown sugar, but to me feels more savoury with cider vinegar, onion and a lot of spices. Luckily, I don’t think there is such thing as the Chutney Police, and both are great with cheese! 

Spiced Nectarine Chilli Chutney

I like making small batches of jams and chutneys, using roughly a kilo of fruit at a time. This gives me around 2-3 jars of finished jam. To me this is much more manageable than having to spend a whole day canning and then sterilising and storing dozens of jars! And even better, each batch takes under an hour to cook! Making small batches also means I can try different flavour combinations more often. In-season fruit is usually very affordable, and lately I have been preserving the vegetables I am growing in my small backyard garden.

This chutney recipe is really easy to make and perfect for beginners. All the ingredients go into a saucepan and are stirred occasionally while they cook and thicken. That’s it! As always, I love a versatile recipe and this is definitely one of those. You can play around with the spices used, or add more or less chilli to your own personal taste. Just a quick note that the chilli was definitely more pronounced and spicy when it was hot and I was tasting for flavour than a few days later after it had been chilled. 

I think this Nectarine Chilli Chutney is absolutely perfect with a crumbly sharp cheddar and some fancy crackers. I’ve bought plenty of chutney in the past but now that I’ve tried home-made, I’m never going back! It’s going to be my new cheese board staple going into autumn, a delicious way to preserve one of my favourite summer fruits. 

Related Post: Roasted Spiced Plum Jam

Spiced Nectarine Chilli Chutney

Spiced Nectarine Chilli Chutney

I think this Spiced Nectarine Chilli Chutney is absolutely perfect with a crumbly sharp cheddar and some fancy crackers. It's going to be my new cheese board staple going into autumn, a delicious way to preserve one of my favourite summer fruits. 

Course Jams & Preserves
Keyword Chutney, Jam
Prep Time 30 minutes
Cook Time 45 minutes
Total Time 1 hour 15 minutes

Ingredients

  • 900 g nectarines, stone removed and roughly chopped
  • 1/2 onion, finely sliced
  • 2 teaspoons yellow mustard seeds
  • 2 teaspoons garam masala
  • 1/2 teaspoon cinnamon
  • 1/2 teaspoon ground ginger
  • 1/2 teaspoon ground white pepper
  • 3/4 cup brown sugar
  • 1/2 cup apple cider vinegar
  • 6 kaffir lime leaves, very finely sliced
  • 2 hot chillies, finely sliced (add more or less to your taste)
  • Salt, to taste

Instructions

  1. Place all ingredients in a saucepan and bring to the boil. Once boiling, reduce the heat to low and simmer for around 40-50 minutes, stirring occasionally. When it’s ready, the mixture will be thickened. Set aside for 10-15 minutes.
  2. In the meantime, sterilise 2-3 glass jars by washing the jars and lids in boiling water and then placing in a low oven (120°C/250°F) until completely dry. Place the warm jam into the jars and seal. Cool to room temperature and then store in the fridge.

Blueberry Loaf Cake with Lemon and Thyme Glaze

Blueberry Loaf Cake

I am hanging on to the end of summer with a celebration of my favourite fruits. This delightful Blueberry Loaf Cake is the perfect treat for afternoon tea. It’s full of fresh bursting blueberries and covered in a tangy cream cheese glaze flavoured with lots of lemon and delicate thyme leaves. 

If you’ve been reading for a while, you might know that I love creating recipes with fruit. I’ll choose a fruity dessert over chocolate almost every time. We are so lucky that there is such a variety of beautiful and delicious fruits every season. Berries are so different to peaches or figs, but I love them all for different reasons. It’s not hard to find cooking inspiration just by heading to the farmers market and looking at what’s in season. To me, fruit is one of the most versatile ingredients to play with as a baker and I love making it the star of the show.

Blueberry Loaf Cake

But if fruit is the real star, it has so many supporting characters that help to make it shine. Warming spices like cinnamon, ginger and of course vanilla are always winners. A splash of bourbon with peaches or Chambord with berries takes the hero ingredient to another level.

But today we’re talking fruit and herbs.

Blueberry Loaf Cake

My herbs are going wild out in the garden so I’m always looking for interesting ways to use them. It may sound unusual but if you’ve never tried the combination of strawberry and basil, pineapple and coriander, watermelon and mint or lemon and rosemary, you’re really missing out! Today’s choice was blueberry and thyme – a match made in heaven. 

I had an abundance of fresh blueberries and wanted to use them in a special recipe. The idea of a loaf cake kept coming to mind, which is actually something I don’t make that often. My pretty new pink loaf pan, which may have had something to do with it!

Blueberry Loaf Cake

I wanted the texture to be lighter than a pound cake, not too dense. I knew there would be yoghurt or sour cream in the mix to add a bit of tang. There would be jammy pockets of blueberries all throughout the cake, and lots and lots of lemon zest. I wanted a glaze that wasn’t too sweet with a big hit of lemon and lots of fresh thyme.

Well, I think I pretty much nailed it! We really loved having big slices of this Blueberry Loaf Cake with a cup of French Earl Grey tea. It’s the perfect afternoon tea treat! The best part is when you get a little of everything in the one bite – the tender cake, a jammy blueberry and some of that delicious glaze too.

Blueberry Loaf Cake

As usual, I encourage you to take this recipe and make it your own. I think it’s a great simple cake base that can be adapted. I just know I’ll be making it again and again. You could make it a round cake instead of a loaf. If you like the idea of a frosting better than a glaze, just leave out the milk for a spreadable texture. I think any other berry would work really well here too!

Blueberry Loaf Cake

Blueberry Loaf Cake with Lemon & Thyme Glaze

This delightful Blueberry Loaf Cake is the perfect treat for afternoon tea. It’s full of fresh bursting blueberries and covered in a tangy cream cheese glaze flavoured with lots of lemon and delicate thyme leaves. 

Course Cake
Keyword Cake, Dessert, Summer
Servings 8

Ingredients

  • 110 g butter, room temperature
  • 1/2 cup caster sugar
  • 1/2 cup sour cream
  • 3 eggs
  • 1 1/2 cups self-raising flour
  • 1 teaspoon baking powder
  • 1/2 teaspoon salt
  • Zest of 1 lemon
  • 1 cup fresh blueberries

Lemon & Thyme Cream Cheese Glaze

  • 120 g cream cheese
  • 3 tablespoons icing sugar, sifted
  • Zest of 1 lemon
  • Juice of 2 lemons
  • 1/2-1 teaspoon fresh thyme leaves
  • 5-8 tablespoons milk

Instructions

  1. Preheat the oven to 180°C / 160°C fan forced (350°F). Grease and line a loaf pan with non-stick baking paper.
  2. Cream the butter and sugar together in a large bowl until pale and fluffy. Add the sour cream and beat until combined. Add the eggs and mix in one at a time until combined. Add the flour, baking powder, salt and lemon zest and beat until combined, being careful not to overmix. Add the blueberries and gently mix in with a spatula, being careful that they don’t burst.
  3. Pour the cake batter into the loaf pan and bake for around 30 minutes or until a skewer inserted into the centre of the cake comes out clean. Allow to cool in the loaf pan.
  4. In the meantime, make the glaze. Mix together the cream cheese, sugar and lemon juice in a bowl. Add the lemon juice and thyme leaves and mix again. Add the milk a little at a time until the desired glaze consistency is reached.
  5. To serve, drizzle the glaze over the top to cover completely. Serve in thick slices with a cup of your favourite tea.
  6. The un-glazed cake will store in an airtight container for 2 days but is best to eat fresh on the day that the glaze is added.

Easy Salami Pasta with Cherry Tomatoes & Burrata

Easy Salami Pasta with Cherry Tomatoes & Burrata

I am literally always on the lookout for new weeknight dinner ideas. While I love having a few favourite dishes that I make over and over, I find it really refreshing and fun to try new recipes. But sometimes I forget to share them here on the blog! This super easy Salami Pasta with Cherry Tomatoes is one that I’ve been making often since 2014, but I am only just getting around to sharing it with you now!

I came up with it when I was house-sitting for a friend and had a few seemingly random ingredients on hand. I put them together in a pan and magic happened! Honestly, is there a better combination than tomato and basil? Maybe yes, if you add salami and burrata too 😉

Easy Salami Pasta with Cherry Tomatoes & Burrata

Sometimes when I have had a crazy day or everything has gone wrong, this dish is a little way to treat myself. It has some of my favourite ingredients combined and it feels like a moment of self care to actually cook a dish that I love rather than ordering something unhealthy or eating toast for dinner. Luckily, the sauce component of the dish comes together in less time than it takes to cook your pasta. In fact, it’s so quick that if you start cooking the sauce before you put your pasta into the boiling water, you’ll be waiting around for the pasta to finish cooking.

I think this Salami Pasta would also be a nice homemade option if you’re having a Valentine’s Day dinner at home with your sweetheart. If you’re not a confident cook, this recipe is super easy but impressive and more importantly it’s DELICIOUS. Just serve with a nice wine, a loaf of crusty bread and a green salad on the side. Cozy and perfect for a romantic night in.

Easy Salami Pasta with Cherry Tomatoes & Burrata

Cherry tomatoes are the star here and the recipe just isn’t the same using a tin of tomatoes. This summer I have been lucky enough to use all home-grown cherry tomatoes from my garden. They’ve been a big winner for this newbie gardener, and I have 3 plants that are taller than me now! I am growing two kinds – Sugar Gloss which gives you a smaller, traditional red tomato and also Black Cherry Tomatoes, which are a darker purple.

Every week I am harvesting a heap of cherry tomatoes and this is one of my favourite things to do with them. You can use any kind of cherry tomato, or a mix. I love those punnets you can buy at the supermarket that have a variety of colours and sizes. The cherry tomatoes blister and cook in the heat of the pan, creating a sauce as they burst. The tomatoes also give a pop of flavour and jammy sweetness.

Easy Salami Pasta with Cherry Tomatoes & Burrata

Next up we have salami, which gives you a heap of flavour. I think it’s a great versatile ingredient and I almost always have some in my fridge. You can use any salami that you like. It is a dominant flavour so make sure you use a good quality one that you love the flavour of. Sometimes I mix it up and use a spicy one, but today I used a pork and fennel salami. I also love that the salami is roughly torn by hand for this recipe which gives it a rustic touch. The oil that comes out of the salami flavours the garlic beautifully and often means you don’t need to add extra olive oil. 

Easy Salami Pasta with Cherry Tomatoes & Burrata

The cherry on top for me is the burrata added to the finished dish that gives so much creaminess. Burrata is a fresh Italian cheese. It has a soft ‘shell’ that gives way to a super creamy inside. It can be a little hard to find in shops sometimes. If I can’t get my hands on it I will substitute with torn mozzarella or bocconcini cheese. The cheese starts to melt with the heat of the pasta and adds another dimension to this dish.

This dish is also great with any kind of pasta. I’ve made it with almost every shape and size you can imagine. This time I tried bucatini, a spaghetti-like noodle with a hole in the middle, which was awesome. So there you go, I’ve finally shared one of my Salami Pasta recipe! I hope you love it as much as I do.

Related Recipe: Creamy Chicken Pesto with Roasted Cherry Tomatoes

Easy Salami Pasta with Cherry Tomatoes & Burrata

Salami Pasta with Cherry Tomatoes and Burrata

This Salami Pasta with Cherry Tomatoes and Burrata is a delicious and easy recipe, perfect for weeknights or a cozy home-cooked Valentines Day dinner!

Course Dinner
Keyword Pasta, Simple Dinners, Spring, Summer
Prep Time 20 minutes
Cook Time 15 minutes
Servings 2

Ingredients

  • 250 g bucatini pasta, or any shape of your choice
  • 100 g salami, roughly torn into pieces
  • 2 garlic cloves, finely chopped
  • 1 chilli, finely sliced (or to taste)
  • 350 g cherry tomatoes, sliced in half
  • Drizzle of balsamic or red wine vinegar
  • Half bunch fresh basil, finely sliced with a few leaves reserved for garnish
  • 1 fresh burrata
  • Drizzle of olive oil
  • Salt and pepper, to taste

Instructions

  1. Cook the pasta in boiling salted water until al dente and then drain, reserving a small amount of the pasta water.
  2. While the pasta is cooking, place the torn salami into a frying pan and cook on medium heat until crispy. Add the garlic and chilli and stir for a minute until fragrant. Turn down the heat and add the cherry tomatoes, stirring for 5 minutes or until the tomatoes are starting to burst and release their juice. Add a good drizzle of balsamic or red wine vinegar. Add the chopped basil and stir until wilted.
  3. Remove from the heat and add the drained pasta to the frypan, mixing to combine all ingredients and coat the pasta in the tomato juices. If it’s looking a little dry, add 1/4 cup of the reserved pasta water and a drizzle of olive oil. Season with salt and pepper.
  4. Serve with halved burrata ball on each plate and some fresh basil leaves on top.

Homemade Passionfruit Curd

Homemade Passionfruit Curd

Oh hello there. I really didn’t mean to take a 6 month break from blogging, but 2020 was a YEAR, am I right? Without a doubt, the best part to come out of the year-that-shall-not-be-named is my thriving quarantine garden. It’s my new favourite hobby and I love learning all about growing veggies. 

I’ve had my share of rookie mistakes… like when I planted an entire packet of seeds and ended up with 40+ capsicum plants. Or managed to kill rosemary (twice), which are meant to be hardy and almost indestructible. The cherry tomatoes I grew from seed are taller than me now. I’ve grown some very oddly shaped cucumbers, learned how to hand pollinate zucchinis, have been to Bunnings at least once a week and yes, I still have a completely irrational slug phobia. 

Homemade Passionfruit Curd

All in all, I would call this season a success and I am loving cooking with things I have grown myself. It definitely has re-inspired my long-time love of preserving. I’ve made countless batches of Tomato & Chilli Jam and Zucchini Pickles which were gifted to friends and family for Christmas.

In addition to preserving the things I’ve grown myself, our neighbours have a massive sprawling passionfruit vine that has taken over our side of the fence too. Every time I go outside there are a few more ripe passionfruit that have fallen to the ground – fair game, right? 

Homemade Passionfruit Curd

So today we are making one of my favourite things – passionfruit curd!

If you’ve ever had lemon curd, you’ll know the creamy and sweet spread that is perfect on pancakes or in a pie crust. Passionfruit curd is like its tangy tropical cousin. The method is very similar and uses only a few basic ingredients – butter, sugar, eggs, passionfruit juice and a little lemon juice. Only about 10 minutes and a bit of whisking separate you from perfect curd. If you can wield a whisk, you can make this recipe!

Homemade Passionfruit Curd

My best tips for making passionfruit curd…

  • Seedless passionfruit curd can often be better for filling cakes and tarts so I like to strain out the seeds and set them aside. Sometimes I will add a few tablespoons of the seeds back in at the very end. This way you get to control the amount of seeds present for a more pleasant texture as you eat it.
  • Store in the fridge. Because curd contains eggs you have to treat it a little differently to a jam and always store in the fridge. It will last around 3 weeks. You can also freeze it for up to 6 months and defrost overnight in the fridge before you use it.
  • Use a silicone whisk. Some people think that using a metal whisk can react with the eggs and lemon. I haven’t had this problem personally, however it’s easily avoidable by using a silicone whisk.
  • Use a low heat. Some people prefer to make curd in a double boiler (with a non-metal bowl of course) but I just keep the heat a little lower to avoid burning the curd or scrambling the eggs. 
  • If you’re nervous that you may have scrambled the eggs (don’t worry, it happens to the best of us!) just strain the mixture with a fine sieve.
  • Some recipes call for egg yolks only but I like this one that uses 3 whole eggs and 2 egg yolks. The whole eggs help to thicken the curd to a scoop-able consistency which is helpful if you’re using it in between cake layers or sandwich cookies. It will also thicken as it chills in the fridge.
  • I used fresh passionfruit because I have a ton of them but if passionfruit isn’t in season you can also use canned juice.
  • I also made my very first Reel on Instagram if you want to see how I made it!

There are so many ways to use your delicious homemade Passionfruit Curd. My favourite way is swirled with cream on top of a pavlova or through my No Churn ice cream mixture. If you want to get fancy you can try this cake inspired by Christina Tosi from Momofuku, which my sister declared as her favourite of all the birthday cakes I have ever made for her. It’s also completely delicious on a warm scone or a piece of toast. If you’ve got a glut of fresh passionfruit, then you really can’t go wrong!

Homemade Passionfruit Curd

Homemade Passionfruit Curd

Passionfruit curd is like lemon curd's tangy tropical cousin. The method is very similar and uses only a few basic ingredients. Only about 10 minutes and a bit of whisking separate you from perfect curd. If you can wield a whisk, you can make this recipe!

Course Jams & Preserves
Keyword Jam
Prep Time 20 minutes
Cook Time 15 minutes
Servings 2 cups/jars

Ingredients

  • 2/3 cup 160ml passionfruit juice (seeds strained out and reserved)
  • 165 g butter
  • 3/4 cup caster sugar
  • 1 tablespoon lemon juice
  • 3 eggs
  • 2 egg yolks

Instructions

  1. Place passionfruit juice, butter and caster sugar into a saucepan and whisk over medium heat until the butter is melted and the sugar has dissolved
  2. Put 3 eggs and 2 egg yolks into a bowl and whisk them together. Pour the passionfruit mixture over the eggs slowly and whisk them together.
  3. Put the mixture back into the saucepan and whisk continuously for 6-7 minutes until it has thickened and coats the back of a spoon. Sometimes I like to add a few tablespoons of the passionfruit seeds back into the curd.
  4. Pour into sterilised jars and store in the fridge for up to 3 weeks.

Pulled Pork Baked Beans

Pulled Pork Baked Beans

Ahhh Baked Beans. I think almost everyone has some memory or association with them, whether it was an after school snack or a favourite on the buffet breakfast… but not me. I was a fussy kid and the list of things I didn’t like was probably longer than what I would eat. I’ve grown out of a lot of my food fussiness but unless there is a literal apocalypse, I don’t think I’ll ever willingly reach for a can of baked beans. 

It was completely surreal walking around the supermarket in mid-March, during the height of pandemic panic buying. Toilet paper was the first to go, then pasta and baked beans soon followed. As with most things, the homemade version is a million times better and that is what I want to share with you today!

Pulled Pork Baked Beans

Pulled pork baked beans.

Perfect on toast with a little crumbled fetta, but you could also serve alongside poached eggs and roasted tomato if you’re missing cafe style brunches. If you want to get technical, my version is actually not baked. It’s simmered in a slightly sweet, slightly spicy tomato sauce, thanks to flavour-packed ingredients like golden syrup, smoky paprika and cayenne pepper.

I had all of these ingredients already in my pantry so I think it’s great for times like these. However feel free to make substitutions if you don’t have everything on hand. I always like to make recipes that are flexible because I never cook something the same way twice! Just make it work with what you have, taste along the way and make it your own.

Pulled Pork Baked Beans

I like the big fat butter beans but cannellini, navy or pinto beans are all great options too. You may need to adjust the cooking time to 15 minutes since these beans are smaller. You could probably even try this with chickpeas in a pinch. If you are using dried beans, prepare as you normally would by soaking first and pre-cooking until almost tender before adding to the sauce in this recipe.

Some other substitutions for you. Golden syrup can be switched out with maple syrup, honey or even a little brown sugar. If you like it really smoky you could add some treacle or blackstrap molasses. I used malt vinegar but you could try apple cider vinegar or even balsamic. No fresh herbs? Dried thyme or rosemary are totally good too. If you like it spicy, add chipotle in adobo, a splash of your favourite hot sauce or as much cayenne as you can handle!

Let me preface this by saying, I almost always have pre-cooked pulled pork in the freezer. I’m not sharing the recipe for that today, but please comment if you would like me to post in the future. Instead of pulled pork you could fry up some diced bacon or speck with the onions in Step 1. You could also substitute with any other kind of shredded slow cooked meat (chicken or brisket would be good). If you are vegan, try using pulled jackfruit. Failing everything else, the beans in this delicious tomato sauce are still a winner! 

Pulled Pork Baked Beans

Not only is this recipe really quick and easy to prepare, but it makes a generous 4-5 servings. So you can #mealprep this in advance and heat it up for a super quick breakfast, brunch or even breakfast for dinner! If you are home-schooling your kids this recipe could make a great easy lunch too. These pulled pork baked beans are hearty and comforting and keep you satisfied for a really long time. I would recommend heating it on the stove not the microwave because I did not realise that beans can explode… Let’s just say I learned that one the hard way and had a huge mess to clean!

I hope you enjoy this recipe and that you’re keeping safe at home during these uncertain times. Please leave me a comment below if you have any specific recipe requests. Tag me on Instagram @spicyicecream if you give this one a try!

Related Post: Carrot Cake Ricotta Pancake

Pulled Pork Baked Beans

Pulled Pork Baked Beans are a hearty and comforting meal for any time of day, using ingredients you probably have in your pantry!

Course Breakfast, Brunch
Keyword Australian, Breakfast, Simple Dinners
Prep Time 10 minutes
Cook Time 20 minutes
Total Time 30 minutes
Servings 4

Ingredients

  • 1 tablespoon olive oil
  • 1/2 onion, finely chopped
  • 2 cans butter beans
  • 1/4 teaspoon fresh thyme leaves
  • 3 tablespoons golden syrup or maple syrup
  • 1 1/2 teaspoons smoky paprika
  • 1 teaspoon garam masala
  • 1/4-1/2 teaspoon cayenne or chilli flakes, to taste
  • 2 tablespoons Worcestershire sauce
  • 2 tablespoons malt vinegar or apple cider vinegar
  • 2 tablespoons tomato paste
  • Salt and pepper, to taste
  • 1 cup pulled pork

To serve

  • Sourdough bread
  • Drizzle of olive oil
  • Fetta cheese, crumbled
  • Fresh thyme leaves, extra (optional)

Instructions

  1. Heat olive oil in a medium frypan, add the onion and cook until translucent. Drain and rinse the beans and add to the pan with the thyme leaves.
  2. Add the can of tomatoes, golden syrup, paprika, garam masala, cayenne if using, Worcestershire sauce, vinegar, tomato paste and salt and pepper. Simmer for 10-15 minutes and then taste for seasoning. Add the pulled pork and heat for a further 5 minutes. Add a little water or stock if the sauce becomes too thick.
  3. To serve, brush slices of sourdough with olive oil and toast in a frypan or in the oven until golden brown. Pile the toast high with a generous spoonful of baked beans. Drizzle with a little olive oil and scatter with crumbled fetta and fresh thyme.

Flourless Orange and Almond Cake (Gluten Free)

Flourless Orange and Almond Cake

At this time of year I would usually be elbow deep in cinnamon roll dough with warm spice aromas coming from the oven and filling my apartment. But you may have noticed that 2020 is not like other years. There is the biggest worldwide crisis in a century happening affecting almost everything about day to day life. My heart goes out to all those who are suffering with illness and unemployment among all the other stresses right now. 

I have been keeping a daily gratitude journal for years and have continued to do so in these crazy times. Some days I write three things and other days I write three pages. These days I am especially grateful for the little things that are easy to take for granted. If you are feeling stressed and anxious, I would recommend grabbing a notebook giving this a try. Even though this situation is scary with so many unknowns, shifting your brain into a feeling of gratitude for even a short time can really help.

Flourless Orange and Almond Cake

There have been several weeks of grocery shortages and supply issues here in Australia, as I’m sure there have been all over the world. Toilet paper was the first to go, followed by pasta, cleaning products, canned and frozen food. It was crazy to see the grocery shelves stripped bare. I’ve managed to find everything I needed except flour for over a month, but I still wanted to bake something special.

Enter this delicious Flourless Orange and Almond Cake. This is a lovely cake for Easter, Mother’s Day, a birthday celebration or even just a weekend cooking project. I adapted the recipe from a Donna Hay recipe that I’ve been making for years. The original recipe does require a small amount of flour and I’ve made it this way many times with great success. But I wanted to see if it would work completely flourless too, and it turned out great. I will link to the original and share the changes I made in the recipe below.

Flourless Orange and Almond Cake

When I first made the cake I was intrigued because whole oranges are cooked, deseeded and then pureed whole. Then the rest of the cake ingredients are added to the same food processor, so it’s ridiculously easy to make. If you are stuck indoors and new to baking, cakes rarely get simpler than this, so it’s perfect for newbie bakers. As I mentioned, I made this one totally flourless so it becomes gluten free. The almond meal gives the cake a beautiful crumb while keeping it nice and moist. 

The original cake is served warm with a sweet orange syrup but I decided to go all out on decorating! Firstly I baked it in two layers, which I think it pretty but optional. Then I made a super easy whipped mascarpone icing and topped the cake with fresh figs, raspberries, pomegranate, chopped pistachios and rose petals to make it really special. I’m not that great at cake decorating but I truly love how this turned out. 

Flourless Orange and Almond Cake

If you want to experiment further you could try this with other citrus fruit or other nut meals. I think a combination of almond and pistachio would be really nice! You could also halve the recipe if you are isolating solo, or make this as individual mini cakes. You could try a chocolate ganache icing for a jaffa cake vibe or maybe an orange blossom buttercream. The options are endless!

Update – I did find flour last night, and practically did a happy dance in Coles. Maybe there will be cinnamon rolls afterall! 

Related Post: Blueberry Crumble Cake

Flourless Orange and Almond Cake

Flourless Orange and Almond Cake

This delicious Flourless Orange and Almond Cake is perfect for Easter, Mother's Day or birthday celebrations. It's also gluten free!

Course Cake, Dessert
Keyword Cake, Dessert
Prep Time 1 day 45 minutes
Cook Time 1 hour
Total Time 1 day 1 hour 45 minutes
Servings 8

Ingredients

  • 2 oranges, washed well
  • 125 g butter
  • 1 cup caster sugar
  • 5 eggs
  • 2 1/2 cups ground almonds, sifted
  • 2 teaspoons baking powder
  • 1 teaspoon vanilla extract

Mascarpone Icing

  • 250 g mascarpone
  • 1 cup icing sugar, sifted
  • 1 teaspoon vanilla bean paste or extract
  • 1/2 teaspoon rose water or orange blossom water (optional)

Decorations

  • Fresh figs, cut into quarters or eighths
  • Fresh raspberries
  • Pomegranate arils
  • Finely chopped pistachios
  • Edible dried rose petals

Instructions

  1. Preheat oven to 180°C (350°F). Line the base of two 20cm cake tins with non-stick baking paper.
  2. Place the oranges in a saucepan of water, cover and simmer for 30-40 minutes or until soft. Remove from the water and chop roughly, removing any seeds.
  3. Process the orange, butter, sugar, eggs, ground almonds and baking powder in a food processor until smooth. I have a small food processor so I had to process the oranges first and transfer to a large bowl, and then process the remaining cake ingredients separately and mix them together.

  4. Spoon the mixture evenly into the prepared cake tins and bake for 45 minutes-1 hour or until cooked when tested with a skewer. Set aside to cool in the tins for 20 minutes and then remove and cool completely.
  5. To make the icing, beat the mascarpone, sifted icing sugar, vanilla and rose/orange blossom water if using until combined.
  6. Place one cake upside down on a plate and spread 1/3 of the icing over the top with a flat spatula. Top with the second cake and then spread a thin layer of icing over the sides for a “naked cake” effect.
  7. Spread the remaining icing over the top and then decorate with figs, raspberries, pomegranate, pistachios and rose petals.

Chai, Fig and Almond Biscotti

What weird times we suddenly find ourselves living in. The Coronavirus situation is changing rapidly. Each day brings updates, new rules and guidelines. Where I live in Sydney Australia all non-essential businesses close today and there are talks of stricter lockdowns being enforced. The supermarket shelves are pretty much empty. I never thought I’d see the day when flour and pasta would be hard to find. It took me four days to find a bag of sugar, and I am one of the lucky ones who is still healthy and able to visit the supermarket, at least for the moment.

On the work front, you may or may not know that all of my clients are in the hospitality industry. Bars, cafes and restaurants have been hit really hard so all upcoming work has been cancelled. Things are uncertain and a little bit scary. But to keep sane, I am looking at this as an opportunity to keep busy working my own projects right now.

Chai, Fig and Almond Biscotti

I would also love to help YOU and share heaps of new content here. I have been wanting to make recipe videos, update older content and definitely be more consistent on this platform.

Do you need easy recipes with pantry staples?

Do you want to know how to make more from scratch? 

That is what I love to do and I feel like I’ve been preaching about cooking from scratch for years. I have been wanting to share more content like this and it seems like this is the time it could really help my community the most.

Chai, Fig and Almond Biscotti

If you want any specific recipes or tips, please leave me a comment below or send me a message on my Instagram @spicyiceream. I really want to help the people who may be new to cooking from scratch navigate this new challenge and help more people feel confident in the kitchen. Most of all, I know we are all in this together and will come out the other side. Hopefully with some new kitchen skills that will serve us well for the rest of our lives!

And now onto today’s recipe. I made this Chai, Fig and Almond Biscotti a couple of weeks ago, which feels like another lifetime at this point. I’m sharing this recipe now because if you’re anything like me, baking calms me down. It helps my stress and anxiety levels like nothing else.

Chai, Fig and Almond Biscotti

I love a weekend baking project because I get so much satisfaction from the process AND the result. And conveniently, this recipe is also made with pretty much all pantry staples, so if you still have access to those, then I hope you will give this delicious biscotti recipe a try!

Almond Biscotti was one of the first few recipes I ever published on my blog and a treat that I will always love. It means “twice baked” because of the two step process. First the dough is formed into a log shape and baked for the first time. Then it is cooled, sliced with a serrated knife into thin biscuits and baked again until golden and crisp.

Chai, Fig and Almond Biscotti

Another reason I love this recipe is that it is super adaptable. While I loved the flavour combination of warming chai spices with almonds and figs, I also love recipes that still work perfectly even if you have to substitute out an ingredient here and there. Almond biscotti is a classic but you might not have almonds in your pantry right now! You can substitute hazelnuts or pistachios instead.

I think cranberries, sour cherries or apricots would work nicely in place of dried figs. And feel free to experiment with the spices too. I used ground chai tea with a little extra cinnamon in my version. The dark chocolate drizzle is not strictly necessary, but it is very delicious. I think they are the perfect afternoon treat. A little sweet, nice and crunchy and perfect with a cup of tea.

Stay safe out there, remember to wash your hands and please leave a comment below if there is any specific content you would like me to create.

Related Post: Earl Grey Chocolate Chip Cookies

Chai, Fig and Almond Biscotti

These delicious and crunchy Chai, Fig and Almond Biscotti are made with pantry staple ingredients and are perfect with a cup of tea or coffee.

Course Cookies
Keyword Cookies
Prep Time 20 minutes
Cook Time 50 minutes
Total Time 1 hour 10 minutes
Servings 40 biscuits

Ingredients

  • 2 cups plain flour
  • 1 ½ teaspoons baking powder
  • ¾ cup sugar
  • ¾ cup almonds
  • ¼ cup dried figs, roughly chopped
  • 2 teaspoons chai tea, finely ground and sifted
  • 1 teaspoon ground cinnamon
  • 3 eggs
  • 1 tablespoon vanilla extract
  • 100 g dark chocolate, melted, for drizzling

Instructions

  1. Preheat oven to 160°C (320°F).
  2. Sift the flour and baking powder together in a bowl. Add sugar, almonds, figs, ground tea and cinnamon, and stir together. Add the eggs and vanilla and mix well to form a dough. Divide the dough in two. Place the dough on a lightly floured surface and knead each piece until smooth. Shape into logs and flatten slightly.
  3. Place the logs on a baking tray lined with baking paper and bake for 35 minutes. Remove from the oven and allow them to cool completely. If not completely cool, it will be crumbly when you slice it. Cut the logs into 5mm thick slices with a serrated knife and place on a baking tray lined with baking paper. Bake for 10-15 minutes until the biscotti are crisp. Cool completely.
  4. When biscuits are cooled, drizzle with the melted chocolate on a baking paper lined tray until set. If the weather is warm, you may need to refrigerate them briefly. Store in an airtight container and serve with a cup of tea or coffee.

Peach Crumble Cake

Peach Crumble Cake

Can you still say Happy New Year when it’s almost the end of January? I think it’s ok since this is my first post of the year. I took an (unexpected) extended break from my blog and social media after the holidays. It was actually really nice to recharge my creativity and cook for fun without thinking about recipe testing! But now I have so many ideas for new recipes and we’re starting off on a high note with this delicious Peach Crumble Cake!

If you have been reading for a while, you’ll know that cooking with summer fruit is my favourite. I could talk about stone fruit all day, just don’t ask me to pick a favourite. For me, the summer is split up in terms of seasonal fruit. December is all about cherries and berries, January is peaches and nectarines. February is about mangoes and tropical fruit and then late summer usually has the most beautiful figs and plums. We’re definitely spoiled for choice and I’m here for it all!

Peach Crumble Cake

Today’s recipe is a variation on my favourite Blueberry Crumble Cake. There are three delicious layers here – the soft cake layer that comes together so easily from things you probably already have in your pantry. This time I doubled the cinnamon and added some ginger because it’s so delicious with peaches.

Next I layered ripe fresh peach slices over the cake batter. They soften and bubble as they bake in the oven to almost a jammy consistency. Don’t be shy with the fruit – the more the better! You could even double the amount if you really like peaches! I hope you’ll give it a try before peach season (and picnic season) are over, but really, this cake is great any time of year with whatever fruit is in season. Or maybe try a combination – peach AND blueberry next time??

Peach Crumble Cake

The top layer is a delicious crunchy crumble – with some pistachios added in this time around. It is also generously spiced with ginger and cinnamon and bakes up beautiful and golden in the oven.

I opted to bake it in a round tin instead of a square this time for something different. But in essence, this cake has everything I love about the original and more. It’s perfect for taking to summer picnics or as a treat with a nice cup of tea. It’s a great snacking cake.

Peach Crumble Cake

As I said in my last post, I love how versatile and easy this cake is. I love to change up the spices a little depending what fruit I’m using. Rhubarb with ginger. Pear and cardamom. Star anise and pineapple. And almost anything goes with cinnamon! Serve the crumble cake warm or at room temperature, plain or with a scoop of ice cream or dollop of whipped cream. 

If you try this recipe, I’d love if you could leave me a comment and a rating below, or tag me on Instagram @spicyicecream! It seriously makes my day to see you guys trying my recipes out!

Related Post: Pear and Pistachio Crumble with White Chocolate

Peach Crumble Cake
Peach Crumble Cake
5 from 1 vote
Print

Peach Crumble Cake

This Peach Crumble Cake is perfect for summer picnics. It's simple to make and super delicious with a hint of cinnamon and ginger.

Course Dessert
Keyword Cake, Dessert
Servings 8 people

Ingredients

  • ¾ cup sugar
  • 55 g butter, softened
  • 1 egg
  • 1 teaspoons vanilla extract
  • ¼ cup milk
  • ¼ cup pouring cream
  • 1 ½ cups plain flour
  • 1 teaspoons baking powder
  • ½ teaspoon salt
  • 2 teaspoons ground cinnamon
  • 2 teaspoons ground ginger
  • 3-4 fresh peaches, sliced into eighths

Crumble

  • ¼ cup sugar
  • ¼ cup brown sugar
  • 1/3 cup plain flour
  • 1 teaspoon ground cinnamon
  • 1 teaspoon ground ginger
  • 55 g butter softened
  • 1/4 cup pistachios, chopped

Instructions

  1. Preheat the oven to 180°C (350°F). Grease a 20 x 20cm (8 x 8 inch) pan. Cream together the sugar, butter, egg and vanilla extract.
  2. Combine flour, baking powder, salt, cinnamon and ginger in a medium bowl. In another bowl or jug, combine milk and cream. Add flour mixture to the butter in thirds, alternating with milk, starting and ending with flour. Pour batter into the pan. Top with a layer of sliced peaches.

  3. To make the crumble topping, combine the sugar, brown sugar, flour, cinnamon and butter. Rub butter into the mixture with your fingertips, and then add the pistachios and combine. Sprinkle evenly over the peaches.

  4. Bake for 30-40 minutes until crumble is golden brown and a skewer inserted into the cake comes out clean. Cool in the baking tin for 10 minutes before cutting into slices.

Best Recipes of 2019

Spicyicecream Best Recipes 2019

I’m not sure what day it is and I’ve definitely eaten too many fruit mince pies, but I love the time between Christmas and New Years. It just feels so relaxed, the perfect time to do some reflection, journalling and goal setting for the year ahead. I honestly can’t believe that I’ve been writing this little blog since 2007 and we’re now heading into 2020! My little baby blog turns 13 in July!

I am really proud of the recipes I shared – 25 posts in total this year. There were breakfast ideas, drinks, jam, pickles and some delicious simple dinners. I am always seeking to improve my cooking, baking, preserving, styling and photography skills and share what I’ve learned here.

I just want to say THANK YOU for reading my new posts, trying my recipes, tagging me in your photos on Instagram and supporting me here for so many years. I can’t tell you how much I appreciate it. I hope you have a lovely start to your New Year, and without further ado, here are my best recipes of 2019!

Raspberry and Ricotta Baked French Toast

1. Raspberry and Ricotta Baked French Toast

When I still lived at home we had a tradition for Easter, Christmas, Mother’s Day and birthday breakfasts to make something special and different from the day to day. I had these memories in mind when I made this recipe. I love that this French Toast can be assembled the night before and just popped into the oven while the coffee brews. The addition of raspberry jam and ricotta was so delicious. I just know I will be making this again over and over.

My Favourite Homemade Zucchini Pickles

2. My Favourite Homemade Zucchini Pickles

Pickling and preserving has become a massive passion of mine over the years. I can’t believe it took me this long to share my absolute favourite pickle recipe! This uses zucchini instead of cucumber and it’s perfect on burgers, toasties, sandwiches and cheese boards. Making things from scratch is so satisfying. You definitely don’t need to live on a farm or even grow your own veggies to be into preserving. I really encourage you to give homemade pickles a try in 2020!

Pimms Cup Spider Ice Cream Float

3. Pimm’s Cup ‘Spider’ Ice Cream Float

Now this is a fun little drink. One of my best recipes of 2019 was this Pimm’s Cup Ice Cream Float. Here in Australia, we call it a ‘Spider’ and I grew up drinking them as a kid. This boozy version is a grown up take and made me feel all kinds of nostalgia. It’s a cocktail and a dessert all in the one glass! I love boozy desserts and dessert inspired cocktails, so this ticks all the boxes for me.

Sticky Date Smoothie Bowl

4. Sticky Date Smoothie Bowl

A Smoothie Bowl is a great way to get in some nutrients first thing in the morning and this one is like eating dessert for breakfast! Sticky Date Pudding is my favourite dessert ever. It’s the most delicious smoothie I’ve ever made! But what’s a smoothie bowl without toppings? You want taste as well as texture in every spoonful so I topped it with fresh figs, homemade granola, almonds and a drizzling of rice malt syrup.

Hot Cross Bun Pull Apart Bread with Cream Cheese Glaze

5. Hot Cross Bun Pull Apart Bread

This was a fun Easter recipe – like a Hot Cross Bun and a cinnamon roll had a baby. The filling tastes exactly like a hot cross bun with brown sugar, spices like cinnamon, nutmeg and mixed spice, fresh orange zest and plump sultanas. There’s something about the beginning of autumn that makes me want to get in the kitchen and bake. And this will definitely make your kitchen smell amazing as it cooks!

Creamy Chicken Pesto with Roasted Cherry Tomatoes

6. Creamy Chicken Pesto

I decided to re-photograph and republish one of my earliest recipes and I’m so glad I did. I can easily say I’ve made this recipe more than 150 times over the last decade! It’s one of my favourite quick weeknight dishes that has definitely stood the test of time. The pesto sauce comes together in less time than it takes to boil water and cook pasta. This one has also been very popular on Pinterest, so I hope you have tried it too!

Pear and Pistachio Crumble with White Chocolate

7. Pear and Pistachio Crumble with White Chocolate

Every winter, crumble seems to be my go-to dessert because it’s endlessly adaptable, always delicious and super comforting. This Pear and Pistachio Crumble is something special. I love the in-season fruit cooked with dessert wine and a hint of cardamom and rosewater. The crumble topping is perfectly buttery and crisp with the addition of pistachios and coconut. Plus, it’s easy, which is a big tick in my book!

Fruit Mince Crumble Pies

8. Fruit Mince Crumble Pies

My most recent favourite recipe, I ended up making FIVE batches of these babies over the Christmas season. Literally everyone said they were the best fruit mince pies they’d ever tried. What an incredible compliment! I loved the boozy, spiced fruit filling with fresh lemon zest and ginger and the crunchy crumble topping that turns golden brown in the oven. I know I am going to get requests to make these for years to come!